Every year within a month before the new Lunar New Year, I make a point of taking a weekend off from everyone else I know on the planet to be with my mom to make Banh Chung… a rice cake that we only make for the Lunar New Year… not only that, but we make a massive number of them (anywhere from sixteen to twenty cakes total… but usually eighteen cakes) and we give some to my maternal grandparents… I take a cake or two back with me and she takes the rest.
INGREDIENTS:
– approximately 10 pounds of glutinous (or sweet rice)
– approximately 6 pounds of mungbeans
– approximately 6 pounds of pork loins (the more lean the better I always say)
– cleaned banana leaves
– salt (approximately 2 tablespoons)
– pepper
– olive oil (if using lean pork)
(creates 16 rice cakes)
Variation: If you are vegetarian then subtract pork and mix mungbeans with sugar. It is tastier with light brown sugar.
Since we make a massive batch… we went with an eight pound hulk of pork loins from Costco (we ended up using up to seven pounds of it though). If you don’t want to go all out with so many rice cakes for yourself the below are approximations of the above for just one rice cake:
– 2/3 pound (though according to the above it is closer to 1/2 + 1/9) of glutinous (or sweet) rice
– 1/3 pound of mungbeans
– 1/3 pound of pork loins
PREPARATION for MUNGBEANS
Day One
1: Soak the mungbeans in water overnight
Day Two
1: Rinse the mungbeans and toss a little salt
2: Put mungbeans into the steamer until it is just cooked through (how to test: take a small portion in hand and smash, if you have to put pressure then it is good, if falls apart easily then it is bad)
3: Ground mungbeans when completely cooled down
PREPARATION for EVERYTHING ELSE
As with all Vietnamese cooking I don’t really have set directions, so here is what I know:
1: Cut the pork in 1/2 inch to 3/4 inch thick slices. Marinate with salt and pepper. Add olive oil if using lean pork. Set aside
2: Clean the banana leaves and wipe reasonably dry
3: Rinse the glutinous rice, drain, toss with a little salt… set aside
Now here comes the fun part… you will need four sheets of aluminum foil approximately 12 inches by 12 inches square and then fold in accordance to the video below:
Once you have the four pieces of aluminum foil all set folllow the video below in putting the rice cake together:
Just for a quick idea of the directions:
1: Cut four pieces of the banana leaves to fit the width inside of the foil “box”. One with the folded flap large enough to cover the entire bottom of the foil “box”, while the other three would have a shorter flap. Place the banana leaves with the shorter flap into the foil “box” first as shown, then place the final banana leaf with the larger flap that covers the entire bottom of the foil “box” last.
2: Pour one rice bowl of glutinous rice into the foil “box”. Use a spatula to spread the rice out to all sides and corners.
3: Pour a heaping custard bowl of the ground mungbeans into the foil “box” and spread out but leaving about a half inch of space between the mungbean bottom and the sides of the banana leaves.
4: Place pieces of the pork loins into the foil “box” making sure to leave approximately an inch of room between the pork loins and the edge of the banana leaves.
5: Pour a heaping custard bowl of the ground mungbeans on top of the pork loins. Use spatula to keep the mungbeans away from the rice.
6: Pour one rice bowl of glutonious rice into the foil “box”
7: Fold the banana leaves down
8: Fold the aluminum foil down…
9: Be sure to keep the box shape… but voila! 🙂
It’s actually a lot easier to watch the video to understand the above steps… but ah well, gotta love family recipes that have been passed down from generation to generation. 🙂 So much better than getting a recipe out of a book I think.
So anyway… that is just putting the darn thing together. Once the rice cakes are all tied up and ready to go you can either start boiling right away or store in a cool place and wait til the next day. 
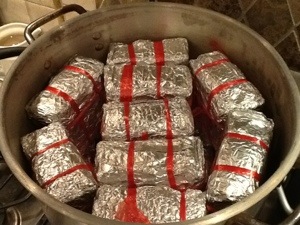
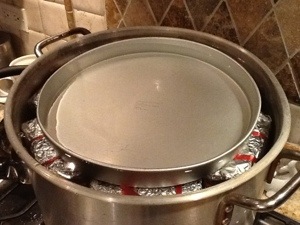
Since my family does not like to wait, we started boiling right away. Before placing the rice cakes into the pot for boiling we put a “cooling rack” at the bottom of the pot so the cakes wouldn’t touch the bottom of the pot. Also when cooking the rice cakes it is preferred to place the cakes vertically (don’t ask me why, that’s just what it is):

The cakes should be completely submerged in the pot of water. It is also preferred to have something on top to hold the cakes down so they don’t float.

Then the rice cakes should be left to cook in a pot of boiling water for up to 18 hours total. My parents typically go for four to six hours for every boiling session. Making sure that they fill up the pot with more water as the water level goes down due to the boiling.
So what happens after the four to six hours of being in boiled water? Well, we had to wait til the water and pot cooled down enough for us to touch then repeat the boiling process two more times for a total of three times (ergo up to 18 hours)… and if you are curious how to get the cake out of the foil and banana leaves:
When ultimately taking the rice cakes out of the water, place them onto a rack on top of a tray to let the water and moisture seep out before storing them in a freezer. You’d be surprised how long these rice cakes can last.
And voila! Enough rice cakes to keep us busy for the new year… yes I am that happy.
